
Dry Ice Projects
How to Remove Floor Tiles
Step 1: Gather Your Materials and Tools
To safely and effectively remove floor tiles, you will need:
Dry Ice: Pieces large enough to cover individual tiles.
Heavy Gloves or Insulated Tongs: For safe handling of dry ice.
Hammer or Mallet: For gently tapping tiles if needed.
Screwdriver or Pry Tool: For lifting tiles once loosened.
Protective Gear: Safety goggles and gloves to protect against flying debris and frostbite.
Step 2: Prepare the Work Area
Ensure the area is well-ventilated, as dry ice sublimates into carbon dioxide gas.
Clear the area of loose debris and any furniture to provide space to work.
Step 3: Apply Dry Ice to the Tiles
Using gloves or tongs, place a piece of dry ice directly in the center of the tile you want to remove.
Allow the dry ice to sit on the tile until the surface becomes frosted. This process freezes and slightly shrinks the tile, weakening the adhesive bond.
Step 4: Check for Tile Loosening
After the tile has frosted, check if it has naturally loosened:In some cases, the tile may pop off on its own.
If it remains attached, proceed to Step 5.
Step 5: Loosen the Tile with Tools
Gently tap the tile with a hammer or mallet to help break the adhesive bond further.
Use a screwdriver or pry tool to lift the edges of the tile. Once loosened, the tile should come off easily.
Step 6: Repeat as Needed
For multiple tiles, repeat the process for each individual tile:Reapply dry ice, wait for frost to form, and loosen as necessary.
This method is especially effective for removing a few tiles without damaging the surrounding area.
Step 7: Clean the Surface
After removing the tiles, scrape away any remaining adhesive or debris using a putty knife or adhesive remover.
Wipe down the area to prepare it for replacement tiles or a clean finish.
Safety Precautions
Handle Dry Ice Carefully: Always wear heavy gloves or use insulated tongs to avoid frostbite.
Work in a Ventilated Area: Ensure adequate airflow to prevent CO2 buildup.
Protect Your Eyes: Wear safety goggles to protect against flying tile fragments.
Avoid Prolonged Contact: Do not leave dry ice in one spot for too long, as extreme cold can damage certain surfaces.
By following these steps, you can use dry ice to effectively and safely remove floor tiles, making replacement or repairs much easier.

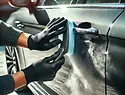
How to Remove Dents and Hail Damage
Step 1: Gather Your Materials
To remove dents and hail damage effectively, you will need:
Dry Ice: A small block or piece for precision application.
Heavy Gloves or Insulated Tongs: To safely handle the dry ice and prevent frostbite.
Access to the Dent: If possible, work from the inside concave part of the dent for better results.
Sunlight or a Heat Source: To warm the metal between applications.
Step 2: Prepare the Dent Area
Inspect the dent to determine whether you can access the inside of the dented surface (concave side).
If not, identify the lowest point of the dent on the exterior side where you can apply the dry ice.
Step 3: Apply the Dry Ice
If working from the inside of the dent:Place the dry ice directly onto the concave part of the dent.
If working from the outside:Hold the dry ice with gloves or tongs so that a corner of the dry ice touches the lowest part of the cratered dent.
Apply gentle pressure, ensuring the dry ice remains in contact with the metal.
Step 4: Frost the Metal
Continue pressing the dry ice against the dent until the surrounding metal is frosted. Ensure the frosted area extends at least 2 inches beyond the edge of the dent.
The intense cold from the dry ice will cause the metal to contract, which can reduce or eliminate the dent.
Step 5: Warm the Metal
Allow the frosted metal to warm naturally. Placing the surface in sunlight is ideal for uniform heating.
Once the metal has returned to room temperature, inspect the dent.
Step 6: Repeat as Needed
Repeat the process of applying dry ice and letting the metal warm up as necessary.
Results:Small, shallow dents may pop out completely after one or two attempts.
Larger or more complex dents may not fully disappear but will be noticeably reduced.
For creased dents, the crease line may remain visible, but the overall dent will appear less pronounced.
Step 7: Check for Paint Damage
While dry ice typically does not harm paint, inspect the surface for any pre-existing cracks or damage in the paint. If the paint is already cracked or broken, peeling may occur.
Safety Precautions
Handle Dry Ice Carefully: Always wear heavy gloves or use insulated tongs to prevent frostbite or burns.
Work in a Ventilated Area: Dry ice releases carbon dioxide gas as it sublimates, so ensure the area is well-ventilated.
Avoid Prolonged Contact: Do not leave the dry ice on the metal for extended periods, as excessive contraction may damage the material.
Supervise the Process: Always monitor the application to avoid unintended effects on the vehicle surface.
By following these steps, you can safely and effectively use dry ice to reduce or eliminate dents and hail damage on your vehicle.
How to Make Witches Brew
Step 1: Gather Your Ingredients and Tools
To create a magical and theatrical witches brew, you will need:
Grape Juice: One can (provides a dark, mysterious color).
Pineapple Juice: One can (adds a strange, pulpy texture for effect).
Food-Grade Dry Ice: 3 to 5 pounds (for bubbling, fog-like effects).
Insulated Gloves or Potholders: For safely handling dry ice.
Ladle: To serve the brew.
Cups: For individual servings.
Step 2: Mix the Juices
Ensure both juices are at room temperature for optimal dry ice activation.
In a large punch bowl or cauldron, pour the grape juice and pineapple juice together. Stir gently to combine, creating the base for your witches brew.
Step 3: Add the Dry Ice
When you’re ready to activate the bubbling, fog-like effect, carefully add 3 to 5 pounds of food-grade dry ice to the punch bowl.
Important Safety Note:Do not touch dry ice with bare hands.
Use insulated gloves or potholders to handle it safely.
Never consume dry ice directly.
Step 4: Serving the Witches Brew
Use a ladle to serve the brew into individual cups.
Ensure that no pieces of dry ice are included in the ladle when serving, as ingesting dry ice is unsafe.
If you want colder drinks, add regular ice to the cups, not the punch bowl.
Step 5: Enhance the Experience
As the dry ice reacts with the liquid, it will create an eerie bubbling effect and thick, fog-like vapors that cascade over the edges of the bowl.
The dramatic fog will last longer if the liquid remains at room temperature and more dry ice can be added as needed.
Step 6: Safety Precautions
Handle Dry Ice Safely: Always use gloves or tools when handling dry ice to prevent frostbite.
Use Food-Grade Dry Ice Only: Ensure the dry ice is labeled food-grade and safe for use with consumables.
Ventilation: Work in a well-ventilated area to avoid excessive carbon dioxide buildup.
Monitor Consumption: Supervise to ensure no one attempts to ingest or touch the dry ice.
Dispose Properly: Allow any remaining dry ice to fully sublimate (evaporate) in a well-ventilated area before discarding the container.
By following these steps, you can create a safe and enchanting witches brew that adds a dramatic, magical element to your event or gathering.

How to Make Smoking Cocktails
Step 1: Gather Your Ingredients and Tools
To create dramatic and safe smoking cocktails, you will need:
Food-Grade Dry Ice: Ensure the dry ice is labeled food grade, meaning it meets the standards for CO2 used in the beverage industry.
Punch or Beverage: Room temperature punch or cocktails for the smoking effect.
Food Coloring: Optional, for vibrant and colorful drinks.
Ladle or Spoon: For serving beverages safely.
Insulated Gloves or Tongs: To safely handle dry ice.
Step 2: Add Dry Ice to Your Beverage
Measure 2 to 3 pounds of dry ice for each gallon of room-temperature punch or beverage.
Break the dry ice into large pieces (not small pieces or pellets) for the best effect and safety.
Carefully place the dry ice pieces into the punch using insulated gloves or tongs. Avoid touching the dry ice directly.
Step 3: Let the Magic Happen
As the dry ice sublimates, it will create thick, fog-like smoke that bubbles and swirls in your beverage, adding a dramatic and spooky effect.
The dry ice will sink to the bottom of the container as it is heavier than regular ice.
Avoid adding regular ice; the dry ice will sufficiently cool the beverage.
Step 4: Monitor the Dry Ice
Do not allow guests to consume or swallow dry ice. Dry ice must never be ingested, as it can cause severe injuries.
As the dry ice sublimates, it may form small floating pieces surrounded by regular ice. These pieces still contain a tiny core of dry ice and should not be served or consumed.
If too much dry ice is added, it may freeze the beverage. Have extra liquid available to adjust consistency as needed.
Step 5: Serving the Cocktails
Use a ladle or spoon to carefully serve the beverage into individual glasses.
Ensure no pieces of dry ice are included in the serving. Only serve the liquid portion of the beverage.
For added flair, use food coloring to create vibrant, spooky colors like green, purple, or blood red.
Step 6: Alternative Smoky Effects (Optional)
If you don’t want to use dry ice directly in the beverage, place dry ice in a separate container near the drinks to create a spooky atmosphere. The fog will still enhance the mood without touching the drink.
Step 7: Safety Precautions
Handle Dry Ice Carefully: Always use insulated gloves or tongs to prevent frostbite or burns.
Use Food-Grade Dry Ice Only: Ensure the CO2 used to produce the dry ice is safe for beverage use.
Supervise Consumption: Ensure guests understand not to touch or consume any dry ice present.
Ventilation: Use dry ice in a well-ventilated area to prevent excessive CO2 buildup.
By following these steps, you can safely create smoky, dramatic cocktails that are perfect for Halloween or any special occasion. Enjoy responsibly and with flair!

How to Make Spooky Pumpkins
Step 1: Gather Your Materials
To create a spooky, smoking jack-o’-lantern effect, you will need:
Carved Pumpkin: A jack-o’-lantern with a gaping mouth for the fog to flow through.
Small Heat-Resistant Cup: To hold the hot water and dry ice.
Hot Water: To activate the dry ice and produce the fog.
Dry Ice: Food-grade dry ice for safety (handle carefully).
Insulated Gloves or Tongs: To safely handle dry ice.
Step 2: Prepare the Pumpkin
Carve your pumpkin with an expressive or spooky face, ensuring the mouth is large enough to allow the fog to flow out effectively.
Remove any leftover pumpkin pulp and seeds from the inside for a clean setup.
Step 3: Set Up the Smoking Effect
Place a small, heat-resistant cup filled with hot water inside the carved pumpkin. The water should be very hot, but not boiling.
Using insulated gloves or tongs, carefully add a small piece of dry ice to the cup.
Immediately place the pumpkin’s lid on top. The dry ice will react with the hot water, producing thick, white fog that pours out through the pumpkin’s mouth and eyes.
Step 4: Maintain the Fog Effect
The fog will last for a few minutes before the water cools or the dry ice fully sublimates.
To continue the effect:Add more small pieces of dry ice as needed.
Replace the water with fresh hot water when it gets too cold to activate the dry ice.
Step 5: Enhance the Atmosphere
For a more dramatic effect, place multiple spooky pumpkins along a path or in a graveyard-themed display.
Use dim lighting or candles to highlight the fog and create an eerie ambiance.
Add props like cobwebs, skeletons, or autumn leaves around the pumpkins for a complete Halloween scene.
Step 6: Safety Precautions
Handle Dry Ice Safely: Always use gloves or tongs to avoid frostbite or burns.
Ventilation: Use in a well-ventilated area, as the fog is primarily carbon dioxide.
Keep Away from Children and Pets: Supervise closely to ensure they don’t touch or ingest the dry ice.
Use Food-Grade Dry Ice: Ensure the dry ice is safe for use in household environments.
Monitor the Pumpkin: Be cautious of water spilling inside the pumpkin, which could weaken it or cause messes.
By following these steps, you can create a safe, spooky, and fun effect that kids and adults alike will enjoy for Halloween!

How to Make Dry Ice Fog
Step 1: Gather Your Materials
To create dry ice fog, you will need:
Dry Ice: 5 to 10 pounds for every 15 minutes of fog production.
Container: A 4 to 8-gallon heat-resistant container.
Hot Water: The hotter the water, the more fog it will produce.
Heat Source (optional): A hot plate, electric skillet, or similar device to maintain water temperature.
Fan (optional): To direct the flow of fog.
Step 2: Add Dry Ice to Hot Water
Fill the container with hot water. The temperature should be just below boiling for optimal fog production.
Carefully add 5 to 10 pounds of dry ice into the water. This will create a thick, flowing fog that cascades over the sides of the container.
Step 3: Adjust for Desired Fog Volume
The amount of fog generated depends on: Water Temperature: Hotter water produces more fog.
Dry Ice Quantity: More dry ice creates thicker fog but depletes faster.
Boiling Water Note: If using boiling water, be cautious. When dry ice is added, the extreme temperature difference can cause violent bubbling and splashing, potentially causing burns.
Step 4: Optimize Fog Flow
Fog Behavior: Fog naturally flows downhill and follows air currents. Use this to your advantage when setting up the effect.
Use a Fan: A small fan can help direct the fog where you want it to go.
Dry Ice Size: Smaller dry ice pellets or pieces with greater surface area will produce more fog but also cool the water faster, reducing the duration of fog production.
Step 5: Maintain Hot Water
Keep the Water Warm: Use a hot plate or similar heat source to keep the water hot for continuous fog production.
Replace Water as Needed: If the water cools too much, replace it with fresh hot water to maintain the fog effect.
Step 6: Choose the Right Container
A container with sides that allow fog to spill over will enhance the visual effect.
Be cautious of splashing:The bubbling caused by dry ice can cause water to splash out of even a ¾-filled container.
Place the container in an area where spilled water will not cause damage.
Fog dampens surfaces, making them slippery over time. Monitor the area and clean up as needed to prevent accidents.
Step 7: Safety Precautions
Handle Dry Ice Safely: Always use insulated gloves or tongs when handling dry ice to prevent frostbite.
Avoid Direct Contact with Skin: Dry ice is extremely cold and can cause severe burns on contact.
Ventilation: Ensure the area is well-ventilated, as the fog is primarily carbon dioxide and can displace oxygen in enclosed spaces.
Keep Away from Children and Pets: Supervise closely to prevent accidents.
Dispose of Water Carefully: Allow water to cool before disposing of it to avoid burns or damage.
By following these detailed steps, you can create a safe, effective, and visually impressive dry ice fog effect for your event or project.
